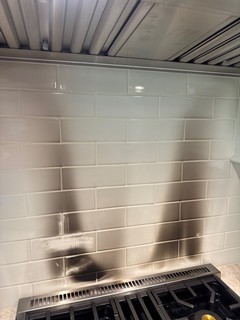
Even after the flames are out and the smoke clears, a fire leaves behind an uninvited guest: stubborn soot and residue that cling to every surface in your home. The discoloration on your walls and the yellow-brown film across your ceiling are more than cosmetic problems. They carry lingering odors, contain acidic compounds that can etch into paint and drywall, and may pose health concerns if left untreated. Knowing how to clean smoke damage on walls and ceiling properly can make the difference between a surface that looks brand new again and one that keeps reminding you of a stressful day. If the job feels overwhelming, professional damage restoration services in Milwaukee, WI can take the guesswork out of the process.
At RestoreMore Inc, we have helped countless homeowners across southeastern Wisconsin recover from fire and smoke events. This guide walks you through what to expect, the supplies you need, and the techniques that actually work, so you can approach cleanup with confidence rather than frustration.
Understand the Type of Smoke Damage You Are Dealing With
Not all smoke residue behaves the same way, and that matters a great deal for cleanup. Dry smoke, produced by fast-burning, high-temperature fires, tends to leave a powdery residue that is easier to wipe away. Wet smoke, which comes from slow, smoldering, low-heat fires, creates a sticky, smeary film that smears if you rub it the wrong way. Protein-based residue from kitchen fires is nearly invisible but carries an intense odor that can be difficult to eliminate.
Before you begin, take a close look at the affected surfaces. Lighter, dusty soot usually responds well to dry cleaning methods, while greasy or dark streaks almost always require a degreasing approach. Identifying the residue early prevents you from spreading it around or driving it deeper into porous materials like drywall and ceiling texture. This step is the foundation of learning how to clean smoke damage on walls and ceiling without making the situation worse.
Gather Supplies and Protect Yourself First
Soot is fine, invasive, and not something you want to breathe in or absorb through your skin. Before touching a single wall, put on protective gloves, safety goggles, and an N95 or better respirator. Open windows and run fans to ventilate the space, and lay drop cloths or plastic sheeting over floors and furniture to catch falling debris.
You will want to have the right tools on hand so you are not stopping mid-project. A practical starter kit includes the following:
- A HEPA vacuum with a brush attachment
- Chemical dry-cleaning sponges, often called soot sponges
- Trisodium phosphate (TSP) or a TSP substitute
- Warm water, clean buckets, and lint-free cloths
- Mild degreasing dish soap and white vinegar for lighter areas
Keeping two buckets going, one for your cleaning solution and one for rinsing, helps you avoid reapplying dirty water to a surface you just cleaned. Change your water frequently, because soot-saturated solution does more harm than good.
Start Dry, Then Move to Wet Cleaning
The single most common mistake homeowners make is reaching for a wet rag first. Water and soot combine into a stubborn paste that smears across walls and sinks into porous surfaces. Always begin with dry methods. Use your HEPA vacuum to gently lift loose soot from the ceiling and walls, holding the nozzle just off the surface so the brush does not grind particles in.
Next, work in sections with a dry-cleaning sponge. Wipe in one direction with firm, overlapping strokes, and avoid scrubbing back and forth. As the sponge loads up with soot, rotate it to a clean side or slice off the dirty layer with a utility knife. This dry phase removes a surprising amount of residue and sets you up for a far more effective wet cleaning.
Once the loose soot is gone, mix your cleaning solution. A common ratio is a tablespoon or two of TSP per gallon of warm water, though you should always follow the product label and test a small, hidden area first. Dampen a cloth, wring it well so it is not dripping, and wipe the surface in sections. Rinse with clean water and dry each area promptly to prevent streaking and to keep moisture from lingering in the drywall. Working from the bottom up on walls helps prevent dirty streaks from running down over areas you have already cleaned.
Tackling Ceilings and Textured Surfaces
Ceilings present their own challenges because gravity works against you and textured finishes trap residue in every crevice. For popcorn or knockdown ceilings, aggressive scrubbing can dislodge the texture itself, so a light touch is essential. Rely heavily on the HEPA vacuum and dry sponge here, and keep any wet cleaning minimal and gentle.
Be realistic about outcomes. Heavily saturated drywall, deeply stained texture, or materials that absorbed significant heat may not fully recover with surface cleaning alone. In those cases, priming with a stain-blocking sealer followed by fresh paint is often the practical path forward. If structural damage, charring, or compromised materials are involved, that moves beyond a DIY project and into professional territory, where our team provides full fire damage repairs and restoration in Milwaukee to bring a space back to pre-loss condition.
Dealing With Lingering Smoke Odor
Clean-looking walls can still carry the sharp, acrid smell of smoke, because odor molecules embed themselves in porous materials. After cleaning, ventilate the room thoroughly and consider running an air purifier with a carbon filter. Bowls of baking soda or white vinegar left in the room can help absorb residual odors over a few days.
For persistent smells, especially after a smoldering or protein fire, surface cleaning rarely does the whole job. Professionals use tools like thermal fogging, ozone treatment, and hydroxyl generators that neutralize odor at the molecular level rather than simply masking it. Soot often travels through HVAC systems as well, so having your ductwork inspected is a smart move that many homeowners overlook when figuring out how to clean smoke damage on walls and ceiling for good.
When to Call the Professionals
Minor soot in a single room is often manageable for a motivated homeowner. However, widespread damage, lingering odor, hidden soot inside wall cavities, and the risk of acidic residue causing permanent staining all point toward professional help. There is also the matter of safety: fires frequently leave behind water damage from firefighting efforts, which can lead to mold if not addressed quickly. Our team regularly coordinates fire cleanup with water damage restoration in Mthe Milwaukee area to prevent secondary problems from taking root.
RestoreMore Inc proudly serves homeowners throughout Milwaukee, Racine, and the surrounding areas, and we understand how disorienting the aftermath of a fire can be. From detailed soot removal to odor neutralization and full reconstruction, we handle each step with care. If you are dealing with significant damage and want experienced hands on the job, our specialists in fire damage restoration in Brookfield, WI and nearby communities are ready around the clock.
Cleaning smoke damage is about patience, the right sequence of steps, and knowing your limits. Start dry, work gently, protect yourself, and address odor at its source. When the damage runs deeper than the surface, reach out for a free assessment so you can restore your home safely and completely. Knowing how to clean smoke damage on walls and ceiling is a valuable skill, but you never have to face a difficult recovery alone.